Greetings!
I have been using Airtel Broadband connection for last few years. At the time of installation, I had opted for the Airtel provided Binatone DT845W wifi modem and it has been serving me well. At one time I was using three devices (Laptop, desktop using Netgear wireless adapter and a notebook) connected to the Binatone modem over wifi.
I had been using WEP Authentication Type with TKIP encryption. I had tried switching to WPA and WPA2 Authentication Type but it did not work properly. I experience frequent drops and therefore settled safely for WEP Authentication Type.
Recently I got new Laptop with Windows 7 Professional (64 bit). Right now this is the only device that I use to connect to modem (no desktop or mobile device). With latest Windows operating system, I decided to configure WP2 Authentication Type with AES encryption. This is way better than WEP with TKIP encryption; both in terms of security and performance (AES is more efficient than TKIP).
As it turned out, setting up "WP2 Enterprise" Authentication Type was anything but easy. I struggled for a couple of days before I managed to get the WPA2 Enterprise Authentication Type working on my Windows 7 laptop. During this time, I engaged with Airtel Helpdesk and technicians and they advised me to downgrade to lower firmware. I could not digest that as the latest firmware is supposed to an improvement over previous versions and not opting for it merely because of some configuration issue, was hard to digest for me.
For benefit of others who are using Windows 7 machine, I am listing down the set of instructions from my learning, which may help you if you want to setup "WPA2 Enterprise" Authentication Type with Windows 7 machine. I searched for some guidance on resolving the issue on internet but could not find anything useful. So thought of writing this blog for similarly affected users.
IMPORTANT: Please follow the below instructions if you want to use "WPA2 Enterprise" Authentication only. As after firmware upgrade, you would not be able to choose any other Authentication Type (like WEP, WPA etc.). The only way out then would be to downgrade to a lower version of firmware. To be on safer side, let me put a disclaimer that I would not be responsible for any damage caused by following below instructions. You may follow them at your own risk.
The "WPA2 Enterprise" authentication setup is set of following steps:
The modem Registration is explained in detail in Do-It-Yourself-Guide. Please refer to page no. 23-28. On New Registration Tab on Airtel website, you need to provide DSL Username and Password for registering your modem. These are the same which are used to configure your modem (refer to screenshot).
 The Username should be <STD code + airtel phone number>_dsl. For example 0114xxxxxx_dsl. Do not give @airtelbroadband.in in your Username.
The password should ideally be your Airtel account number. If there is any confusion, you can get it reset by calling the Airtel helpdesk (198 from Airtel landline) but remember to update the new password in modem configuration interface as well.
Please remember the username and the password that you give while registering your modem (it is not your DSL Username and Password). The same would be required later while connecting your device to your modem.
2. AAA Certificate Installation
Download and install the AAA Certificate from Airtel website. It is fairly simple and the easiest of all steps. You can check the installed certificate in your browser's options.

3. Modem Firmware Update
Visit the Airtel website and downloaded the latest firmware for Binatone DT845W modem. For upgrading the modem firmware, turn off your machine's wifi and connect to your modem using LAN / Patch Cable. open the modem configuration interface on http://192.168.1.1. It asks for the username and password. The username is "admin" and the password should be either "password" or your Airtel broadband account number.
On modem configuration interface, navigate Maintenance -> Firmware.

There you can see the current version of the firmware and the option for uploading the latest firmware.
You need not do anything for "New Romfile Location".

Please note, for updating the firmware using Firefox browser. Sometimes IE gives problem.
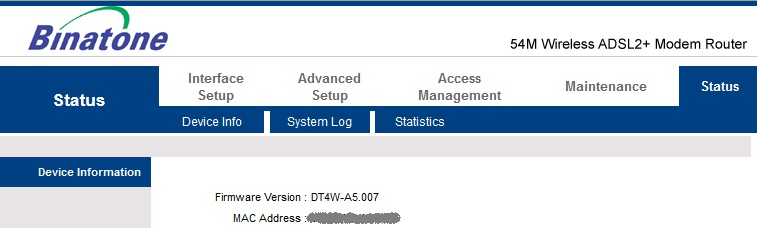
 The upgraded version is now visible. You can also see the MAC Address here.
Once your modem's firmware is upgraded, hard reset your modem once using the reset button at the back side. Keep it pressed for a few seconds and the modem restarts.
 On logging in, you would see that Authentication Type is now set as "WPA2 Enterprise" and this is non-editable.
Choose Encryption Type as AES.
Make sure you are using SSID Number 1.
The Radius Server entries on Wireless tab are automatically set to right values after upgrade but still ensure all settings are as per the page number 22 of Do-It-Yourself guide.
3. Setting Up Wifi Connection Between Modem & Windows 7 Machine
Remove your LAN / Patch Cable from modem and start your machine's wifi. Connect to your SSID using your Windows 7 machine. It would ask you for your Username and Password. Enter Username and Password that you mentioned while registering your modem at Airtel Website using the MAC Address. This Username and Password is NOT your DSL Username and Password. You should be able to connect to your modem now.

Ensure your wireless is properly configured by right clicking on the wireless profile as shown in left screenshot.

In Connection tab, enable "Connect automatically when this network is in range" and "Connect even if the network is not broadcasting its name (SSID)" options.

In Security tab, ensure that Security type is "WPA2-Enterprise" and Encryption Type is "AES".
The network authentication method should be "Microsoft: Protected EAP (PEAP)".
Click on the "Settings" button.
 "Validate server certificate" should be enabled with "Airtel Secure WiFi Certificate Authority" in "Connect to these servers" text box.
Also, in "Trusted Root Certification Authorities", "Airtel Secure WiFi Certificate Authority" should be checked.
Enable "Do not prompt user to authorize new servers or trusted certification authorities" and "Enable Fast Reconnect" options.
Authentication method should be "Secured Password (EAP-MSCHAP v2)".
Click on the "Configure..." button.
 Disable option for automatically using Windows logon name and password.
After all this, you should have a properly set wifi connection between "WPA2 Enterprise" Authentication Type enabled Binatone DT845W modem and Windows 7 machine.
Thanks for your patience!
I have been using Airtel Broadband connection for last few years. At the time of installation, I had opted for the Airtel provided Binatone DT845W wifi modem and it has been serving me well. At one time I was using three devices (Laptop, desktop using Netgear wireless adapter and a notebook) connected to the Binatone modem over wifi.
I had been using WEP Authentication Type with TKIP encryption. I had tried switching to WPA and WPA2 Authentication Type but it did not work properly. I experience frequent drops and therefore settled safely for WEP Authentication Type.
Recently I got new Laptop with Windows 7 Professional (64 bit). Right now this is the only device that I use to connect to modem (no desktop or mobile device). With latest Windows operating system, I decided to configure WP2 Authentication Type with AES encryption. This is way better than WEP with TKIP encryption; both in terms of security and performance (AES is more efficient than TKIP).
As it turned out, setting up "WP2 Enterprise" Authentication Type was anything but easy. I struggled for a couple of days before I managed to get the WPA2 Enterprise Authentication Type working on my Windows 7 laptop. During this time, I engaged with Airtel Helpdesk and technicians and they advised me to downgrade to lower firmware. I could not digest that as the latest firmware is supposed to an improvement over previous versions and not opting for it merely because of some configuration issue, was hard to digest for me.
For benefit of others who are using Windows 7 machine, I am listing down the set of instructions from my learning, which may help you if you want to setup "WPA2 Enterprise" Authentication Type with Windows 7 machine. I searched for some guidance on resolving the issue on internet but could not find anything useful. So thought of writing this blog for similarly affected users.
IMPORTANT: Please follow the below instructions if you want to use "WPA2 Enterprise" Authentication only. As after firmware upgrade, you would not be able to choose any other Authentication Type (like WEP, WPA etc.). The only way out then would be to downgrade to a lower version of firmware. To be on safer side, let me put a disclaimer that I would not be responsible for any damage caused by following below instructions. You may follow them at your own risk.
The "WPA2 Enterprise" authentication setup is set of following steps:
- Modem Registration at Airtel site
- AAA Certificate Installation
- Modem Firmware Upgrade
- Setting up wifi connection between modem & Windows 7 machine
1. Modem Registration at Airtel Site
The modem Registration is explained in detail in Do-It-Yourself-Guide. Please refer to page no. 23-28. On New Registration Tab on Airtel website, you need to provide DSL Username and Password for registering your modem. These are the same which are used to configure your modem (refer to screenshot).

The password should ideally be your Airtel account number. If there is any confusion, you can get it reset by calling the Airtel helpdesk (198 from Airtel landline) but remember to update the new password in modem configuration interface as well.
Please remember the username and the password that you give while registering your modem (it is not your DSL Username and Password). The same would be required later while connecting your device to your modem.
2. AAA Certificate Installation
Download and install the AAA Certificate from Airtel website. It is fairly simple and the easiest of all steps. You can check the installed certificate in your browser's options.

3. Modem Firmware Update
Visit the Airtel website and downloaded the latest firmware for Binatone DT845W modem. For upgrading the modem firmware, turn off your machine's wifi and connect to your modem using LAN / Patch Cable. open the modem configuration interface on http://192.168.1.1. It asks for the username and password. The username is "admin" and the password should be either "password" or your Airtel broadband account number.
On modem configuration interface, navigate Maintenance -> Firmware.

There you can see the current version of the firmware and the option for uploading the latest firmware.
You need not do anything for "New Romfile Location".
On clicking "Upgrade" button the modem would start upgrading the firmware. The progress would be displayed in percentage as shown below:

Please note, for updating the firmware using Firefox browser. Sometimes IE gives problem.
Once your modem's firmware is upgraded, hard reset your modem once using the reset button at the back side. Keep it pressed for a few seconds and the modem restarts.

Choose Encryption Type as AES.
Make sure you are using SSID Number 1.
The Radius Server entries on Wireless tab are automatically set to right values after upgrade but still ensure all settings are as per the page number 22 of Do-It-Yourself guide.
3. Setting Up Wifi Connection Between Modem & Windows 7 Machine
Remove your LAN / Patch Cable from modem and start your machine's wifi. Connect to your SSID using your Windows 7 machine. It would ask you for your Username and Password. Enter Username and Password that you mentioned while registering your modem at Airtel Website using the MAC Address. This Username and Password is NOT your DSL Username and Password. You should be able to connect to your modem now.

Ensure your wireless is properly configured by right clicking on the wireless profile as shown in left screenshot.

In Connection tab, enable "Connect automatically when this network is in range" and "Connect even if the network is not broadcasting its name (SSID)" options.

In Security tab, ensure that Security type is "WPA2-Enterprise" and Encryption Type is "AES".
The network authentication method should be "Microsoft: Protected EAP (PEAP)".
Click on the "Settings" button.

Also, in "Trusted Root Certification Authorities", "Airtel Secure WiFi Certificate Authority" should be checked.
Enable "Do not prompt user to authorize new servers or trusted certification authorities" and "Enable Fast Reconnect" options.
Authentication method should be "Secured Password (EAP-MSCHAP v2)".
Click on the "Configure..." button.

After all this, you should have a properly set wifi connection between "WPA2 Enterprise" Authentication Type enabled Binatone DT845W modem and Windows 7 machine.
Thanks for your patience!